- Fascinating small world
- The means to an end
- The image composition
- Insects in flight
- Tips and tricks
- The equipment
The fascination with macro photography can quickly capture one's imagination, because nowhere in nature photography is there as much unknown to discover as in the close range. In macro
photography, one can also achieve success with relatively low financial effort. If you do not aim for quite specific motifs, you should find promising places that are usually not far
from your home and are ideal for macro photography.
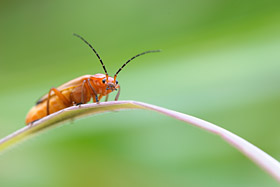
At what scale one now speaks of close-up, macro or micro photography should not be the topic at this point, since there are also differing statements in the
literature for these designations. Rather, I would like to show here my ways to the goal, which should neither be considered complete nor as the only correct procedure. In macro
photography, one can achieve and learn a lot by making use of the fun of experimentation. If a photo does not turn out as desired, a repetition of the same is usually possible
at any time.
(back to the beginning)
As my nature photo workshops assume the basics of photography, I would like to limit the technical part to the things I have used myself and only briefly mention that there are
also other technical aids, such as close-up lenses, extension tubes, bellows, retro adapters and magnifying lenses. Presenting all these devices and techniques would also exceed the
scope of this workshop!
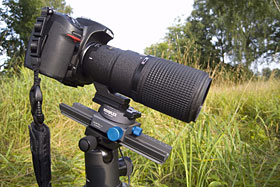
For my macro photography, I exclusively use macro lenses and to be precise, three pieces with different focal lengths (60mm, 105mm, and 200mm). When starting
out in macro photography, one usually asks what focal length a macro lens should have. It is often said that a lot of focal length is needed for insect photography, but that's not
the case. Insects do not have a fleeing distance, but more on that later. The distance to the subject is also often misjudged. With my 200mm lens on a full-frame DSLR, the distance
from the filter thread to the subject, at a 1:1 scale, is just 25 cm! The same measurement with my 105mm lens results in 14 cm and with my 60mm macro lens, there is only about 5 cm
left to the subject for a 1:1 representation. If a lens hood is to be screwed onto the lens now, it will soon become clear when using a 60mm macro lens that there is not enough
space for 1:1 scales. But why have multiple focal lengths and which one is the right one? In addition to the aspect of working distance, there is another much more important reason
to use different focal lengths. A longer focal length, such as a 200mm macro lens, "compresses" the image and that means that less of the background is visible. It is different with
a 60mm macro lens, as here much more of the background is incorporated into the image. At a scale of 1:1, the background design usually does not play a role, but with smaller scales
(e.g. when photographing a dragonfly or flower shots that do not go into too much detail), different focal lengths can achieve very different effects.
(back to the beginning)
Many photographers who start with macro photography focus on having the subject depicted with a sharp focus and in a large depth of field. I also started this way at some point,
but only later realized that this approach often produces boring images. Image composition is also a matter of taste, so I would like to explain only my personal vision of good
image composition below.
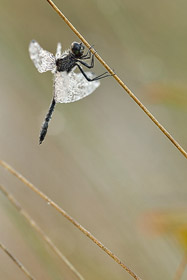
Close-up or include more background? There is actually no "right" or "wrong" in this question. The closer you get to a 1:1 magnification, the more details the
viewer will see that are difficult or even impossible to see with the naked eye. A 1:1 representation offers good opportunities to focus on certain details of the subject, such as the
wing of a dragonfly or a section of a mushroom's cap:
Klick hier
For me, even more interesting are pictures that also make a statement from the background. One is quickly tempted to create a completely dissolved and just sterile background and since
this is rather the exception in nature, the botany around the subject is prepared accordingly. Instead of removing all the plants in the background of the subject and often permanently
damaging it, in my opinion it is more sensible to include the background with the subject. This approach is not only a contribution to nature conservation, but also usually results in
the more interesting and better pictures. However, I also make sure that the background does not become too hectic and therefore too distracting from the actual subject. By choosing
larger apertures, I like to use a 200 mm macro lens, one can effectively counteract too chaotic a background. If the background is still too dominant, one can of course always gently
push aside a disturbing blade of grass or branch for the shot.
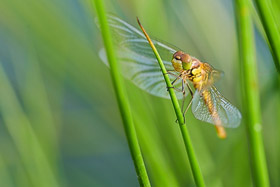
Where to place the focus? In macro photography, the depth of field is always extremely shallow and often only a few millimeters wide. When photographing insects,
I always focus on one or both eyes, but I do not claim that my subject must always be within the focus range. If you want to achieve the best possible focus of the main subject, you
must make sure that the subject is aligned as linearly as possible to the camera. However, an interesting perspective is usually more important to me than aligning the subject linearly.
After all, I don't create my macro photos for a biology book that aims to see as much of a subject as possible. I find the play with depth of field in macro photography much more
interesting and I like to leave some of the main subject out of focus.
(back to the beginning)
Photographing insects in flight is one of the most challenging tasks in macro or close-up photography. A large dragonfly is not only a beautiful subject, but also a manageable task
for the photographer due to its size.
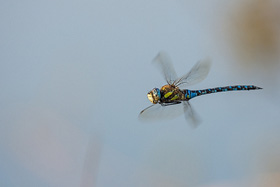
What's the best way to achieve this goal now? First of all, it must be said that taking photos of flying insects is always associated with very high loss.
First, you have to find a pond where dragonflies frequently fly around the shore. A few years ago, I would have tried to take these shots with manual focus, but now modern cameras
and newer lenses are well able to catch dragonflies in flight even with autofocus. However, if the equipment is too slow, manual focus can also be used to achieve the goal.
Dragonflies usually have specific flight paths that they follow during hunting, and then you can pre-focus on a spot with manual focus and hope that the dragonfly will also pass
by there. Dragonflies often remain stationary in the air for a short time during hunting, and then you have to find the dragonfly in the viewfinder, focus, and take the shot. But
as mentioned, expect high loss ;-). It's best to choose a sunny day, as you need relatively high shutter speeds. Don't go below 1/500s, or the loss will be even greater. Of course,
you shouldn't choose noon to take pictures either. Although there is enough light then, the harsh light is not advantageous for a moody nature shot.
(back to the beginning)
My macro shots often occur in the early morning hours, as the light before sunrise is often best for macro photography. Another advantage for the early hours is that there is less
wind before sunrise, as wind often increases after the sun rises. In close-up and macro photography, wind is the worst enemy, as even the slightest gust causes blurry images if the
subject is on small branches, flowers, or blades of grass. Even if you hardly notice the wind, the effects will become clear in the 100% view from the live-view monitor at the latest.
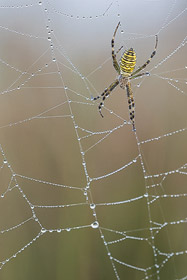
To mitigate the blur caused by wind, I try to wait for a moment with minimal wind. At the same time, I take a series of shots and usually some of them come out
sharp. You can also increase the ISO to shorten the exposure time. There are also technical aids such as sticks to stabilize grass or wind shelters to drape over the subject. However,
I don't hold these aids in high regard as they often prove to be not practical in practice. For a subject like a wasp spider in a web, both of these aids would quickly reach their
limits. Sometimes, there's no other choice but to try the subject again on another day.
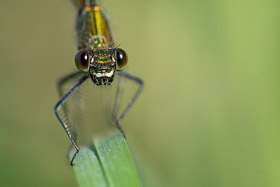
Even though I often use the cold star of insects for sunrise, I don't want to limit myself to that. Especially when the insects are active, their posture
creates motives that cannot be found in the cold star of insects. Of course, approaching the insects is then an additional challenge. Here, it is especially important to avoid
sideways or jerky movements. It takes a little bit of patience, but since I usually take photos with an unstabilized 200 macro lens, I also use a tripod and the insects still often
stay in place. In other words, it's not about being fast, but approaching very slowly and carefully.
(back to the beginning)
In macro photography, a stable tripod should always be present, even if you take some pictures hand-held. Some macro lenses have built-in stabilizationization, but in my experience,
almost every subject can be captured as well with a tripod. With a tripod, you often need a little more patience to achieve success, but the results are usually better than hand-held
shots, as even the slightest shake can have a negative impact on the results in macro photography. In addition to the tripod, I like to use a macro slider to adjust the exact focus
with the movement of the slider. Otherwise, I use small mini reflectors to brighten the subject, and that's it for my equipment accessories.
(back to the beginning)
written: November 2014, (author: Olaf Juergens)
updated: August 2018
 print version


