- What are the Northern Lights?
- The path to success
- The image composition
- Source of light, boon and bane
- Panoramic photography and the Northern Lights
- When and where can you see the Northern Lights?
- The equipment
- A final tip
Before I lose a few words about the formation of the aurora borealis, I would like to point out that this is not a scientifically founded discourse, but here only a rough overview of
the phenomenon of the aurora borealis is intended to be conveyed. Furthermore, I am not an expert in night photography, as I find night photography itself not so exciting and
therefore do not practice it very often. I have a different opinion about the nighttime photography of the aurora borealis, as this is an absolutely fascinating natural phenomenon
that is incredibly fun to photograph. Since I have found very little information on aurora borealis photography on the internet, I thought it would be useful to close this gap
with my report.

The Northern Lights (Aurora borealis) or Southern Lights (Aurora australis) are also known as the aurora and are caused by solar activities. The sun emits
electrically charged particles in addition to heat and light, known as solar winds. These solar winds collide with Earth's atmosphere and are captured by the Earth's magnetic field
and directed towards the North or South pole. When these electrically charged particles collide with air particles, it creates a luminous display in the sky. The solar winds emitted
from the sun's activities take about 1-2 days to reach Earth, so rough predictions about the upcoming auroras can be made a few days beforehand.
In terms of the strength and frequency of solar activity fluctuations, it is commonly noted that these activities move in an 11-year cycle. The last peak of activity was in 2010 and
has since declined. Scientific literature also notes that the 11-year cycle is an average and that fluctuations can occur between 9 and 14 years. During years with the greatest solar
activity, the sun's magnetic field rotates and during this time, the auroras are typically the strongest on average.
(back to the beginning)
Photographing the aurora is relatively simple if you consider a few things. In general, cameras with larger sensors are somewhat better suited than cameras with smaller sensors,
as these cameras tend to produce less noise at higher ISO values. However, modern cameras with crop sensors are now so good that they can also be used for aurora photography. In
addition to the camera, you will need a tripod, a remote trigger, and a lens with as much light as possible. The camera should be able to be manually operated in terms of aperture,
exposure time, ISO value, and focus, as this is essential for the best results!

Polar lights are naturally seen and photographed at night, which presents a small problem as the exposure time cannot be extended indefinitely. If the exposure
time is too long, one will quickly notice that the stars in the photo become streaks, which is generally not desired. The reason for the streaked representation is due to the Earth's
rotation, as our Earth moves further during the shot, the stars are displayed as streaks. Besides the stars, the movement of the auroras is also a reason not to extend the exposure
time too much, otherwise there is a risk that no structures of the auroras will be visible on the photos and instead the sky will be predominantly green.

I cannot and do not want to give an exact value for the exposure time here, as the maximum exposure also depends on the focal length, the movements of the
auroras, and ultimately the direction of the sky. Ultimately, the exposure time in night photography is always a compromise, as if you choose a shorter exposure time, you must
inevitably adjust the ISO value upward, increasing the risk of image noise. As a rough guide, I set a mark for exposure of about 10-15 seconds, anything beyond that can be critical
in terms of the depiction of stars and the movement of auroras. As I mentioned, the camera should be operated manually and so I would choose the exposure time, set the largest
aperture (smallest aperture number) on the lens, and adjust the ISO value so that the exposure of the image fits at the end. The result can then be evaluated on the camera monitor
(histogram) and, if necessary, corrected. It is important to note whether the stars already form streaks. In general, this should not be the case with less than 10 seconds and you
can try to lengthen the exposure time in return for reducing the ISO values. With too high ISO values, unwanted image noise quickly occurs, but I can't name a specific value for the
ISO setting either, as the ambient light and the intensity of the auroras can vary greatly. In the presence of moonlight, ISO values of 400 may be sufficient, while in the dark of
night, ISO values of 6400 and higher are not uncommon.
Just as exposure should also be manual, focusing should be manual as well because an auto-focus has little chance of hitting its target in the dark night. The focus should be set
to "infinity," but since most lenses go beyond the infinity setting, it is not enough to simply set the focus ring to the end stop. I proceed with focusing as follows: First, I
find a star on the horizon using the Liveview and then set the Liveview view to 100% so that I can see the star as large as possible on the monitor. Then, I turn the focus ring
until the star appears as small as possible because then I have set the focus exactly on the star. An alternative would be to focus on an object on the horizon in daylight and then
make a mark on the lens so that you can make the same setting on the lens at night. However, I believe the method with the Liveview is better because this setting is usually
more accurate.
(back to the beginning)
Even though the Northern Lights are already a spectacular and fascinating subject, I still believe that it is important to pay attention to the composition when photographing
the Northern Lights.

Although the auroras are very spectacular and fascinating as a subject, I still believe that even when photographing auroras, one should pay attention to the
composition of the image. Those who only capture the green or reddish lights in the sky and don't pay attention to the surroundings waste a lot of potential in aurora photography.
I generally recommend searching for suitable locations during the day. Even though you never know exactly where the auroras will show up in the end, it makes sense to know the
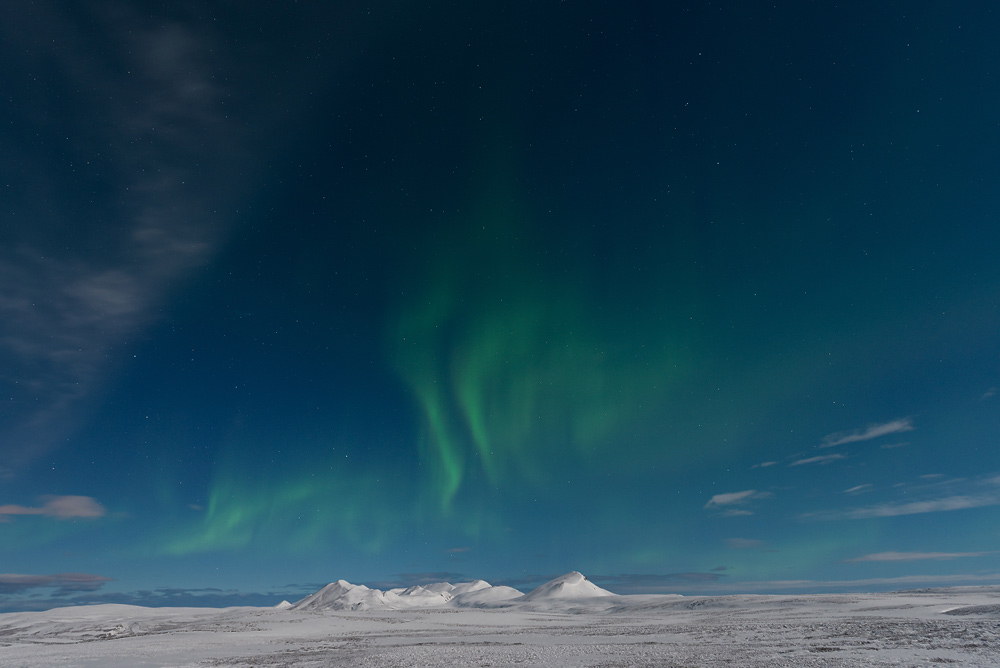
locations well, because at night the orientation is naturally very limited. Most of the image will usually be the sky and even though you shouldn't force yourself to follow a strict
rule, it makes sense to reserve at least 2/3 of the image for the sky. For the remaining composition of the image, you often have the problem that landscapes in the foreground or
background are too dark, because the contrasts are too great compared to the sky. If you're lucky, you'll also get served with moonlight (see image on the right). With moonlight,
you'll get fewer stars, but the additional light provides a nice illumination for the remaining landscape. Another alternative for ambient light would be, for example, to include
an illuminated house, a busy street, a town or a lighthouse in the image. Snow-covered mountains are also suitable, as the white snow reflects the light from the auroras well and
thus provides a more harmonious illumination.
(back to the beginning)

Besides the aurora, you can have different additional light sources. While moonlight usually produces a soft light source that illuminates the surroundings,
artificial light sources look different. An artificial light source will usually result in the artificial light being hopelessly overexposed during long exposures. There's not much
you can do about it, but you should consider the artificial light sources in the composition of the image so that the overexposure does not become dominant.
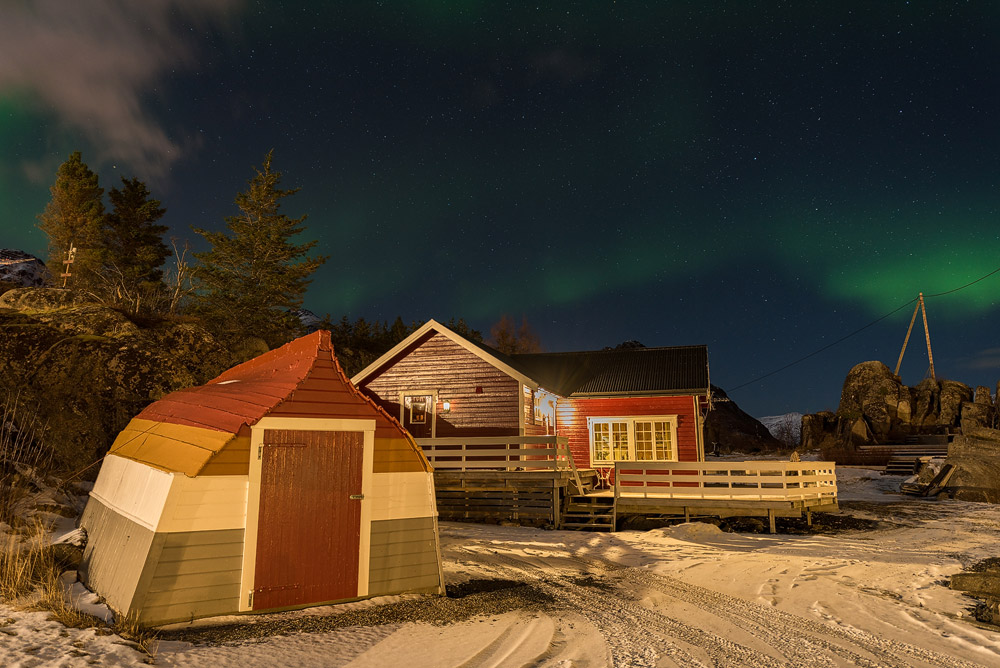
It's different if you have direct control over the light source. Then you should make sure that the light appears as weak or indirect as possible in the image. For example,
if you want your own lit cabin in the picture, you can make sure that the light source in the cabin is very weak and the long exposure will then produce a beautiful illumination in
the cabin. In the example picture with the passing car, I waited until there was no oncoming traffic and made sure that no headlight light directly shone into the lens.
(back to the beginning)

The panoramic photography of the aurora borealis is a special challenge. The difficulty lies in the fact that the auroras move more or less quickly,
which then creates problems when composing the individual images into a panorama. When taking the individual images, the shutter speed should be as short as possible, and
even then it will only work reasonably well if the auroras are not moving too much. I would not make more than three to four individual images per panorama, because the more
time is needed for the entire panorama, the more the aurora will shift in the sky during the exposures.
Often, however, you will still have to do a little work in image editing to remove any visible edges from the aurora's tail. I use a super wide-angle lens (14mm) and mount
the camera in the portrait orientation on the tripod. When mounting the camera, make sure that the tripod is aligned very precisely so that the horizon remains as straight as
possible when you pan for the individual shots.
(back to the beginning)
As previously described, the auroras occur most strongly in the area of the North and South Poles. In Germany, auroras can only be observed extremely rarely and, if at all,
mostly only during the maximum of the 11-year solar cycle. The appearance and frequency of auroras are determined by the 11-year solar cycle that the sun goes through. The
maximum of the solar cycle was last in 2012 and is now decreasing again.

As described earlier, the auroras are strongest in the area of the North and South Pole. In Germany, auroras can only be observed very rarely and if so,
usually only during the maximum of the solar cycle. The appearance and frequency of auroras are determined by the eleven-year solar cycle that the sun goes through. The last
maximum of the solar cycle was in 2012 and is now declining.
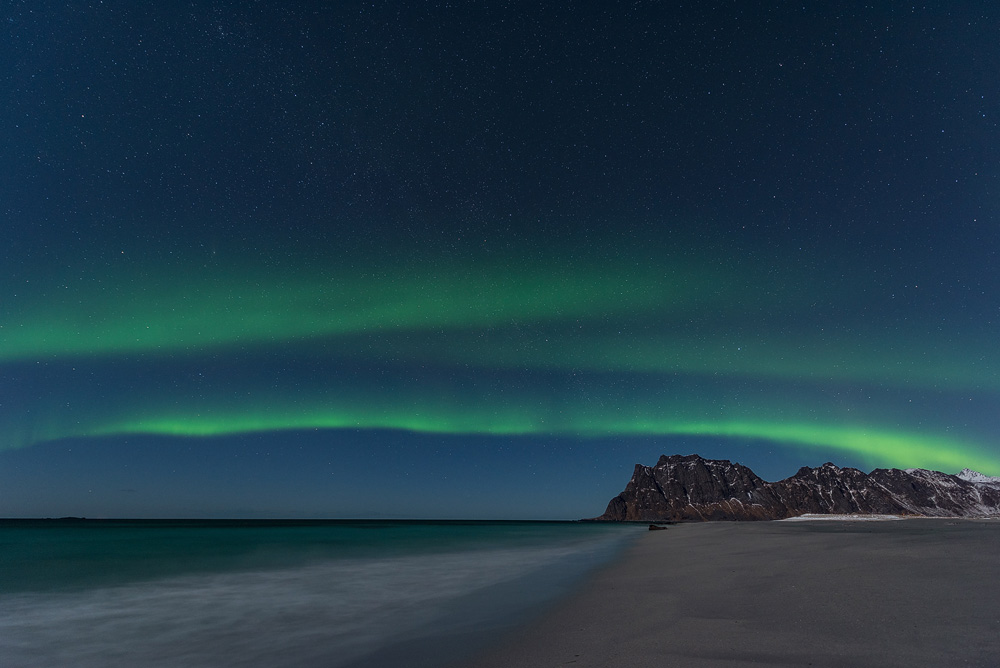
On the northern hemisphere, auroras can best be observed north of the Arctic Circle, making places like Northern Scandinavia, Iceland, or Greenland in Europe ideal. Auroras
not only have different colors (green colors dominate on the northern hemisphere), but also have different intensities. Often, Northern Lights are only very weakly expressed
and only come to full fruition on images through long exposures. For all my photos of auroras, I have not changed anything in terms of colors or color intensity. If the intensity
of the auroras is not so great, you have to observe the sky very closely to discover them. Auroras are best observed in the winter months when the nights are particularly long.
At what times and whether one can discover auroras at night in the sky cannot be predicted exactly. In any case, the sky should be as cloudless as possible in order to be able
to see the natural spectacle. And even though it is usually very cold, one should not succumb to the temptation of searching for auroras from the warm holiday cabin in the sky.
On the one hand, you cannot observe the entire sky from the house, and on the other hand, the interior lighting of the house significantly interferes with finding the auroras.
As a certain prediction of aurora, I found the following website from the Geophysical Institute to be very helpful:
http://www.gi.alaska.edu.
Auroras can appear in various forms and directions, with the largest activities usually showing in a northerly direction. The duration of auroras can also vary greatly, they can
be visible in the sky for just a few minutes or up to half an hour.
(back to the beginning)
In addition to the camera, a wide-angle lens with as much light as possible should be brought along. Usually, the lens should have a minimum light strength of 2.8. Although
there are now wide-angle or super-wide-angle lenses with higher light strengths than 2.8, these lenses generally have a coma distortion error when opened, which means that the
stars are no longer round but are shown with a tail (usually in the corners). A tripod, replacement batteries, and a remote trigger are also helpful. I would also not do without
a viewfinder cover, as there is a risk of stray light entering the viewfinder during long exposures. A headlamp is highly recommended, preferably one that also emits red light,
as the eyes need to readjust strongly after turning off the headlamp when searching for the Northern Lights. The temperatures in winter can reach double-digit minus degrees in
the desired regions, so the clothing should be designed so that you can endure several hours in the night without discomfort.
(back to the beginning)
A tip for people who are capturing the Northern Lights for the very first time and have limited experience with night photography: I suggest practicing on your local starry
sky before embarking on the trip. You will quickly get a feel for the correct exposure times and focusing on the stars. With this trained routine, you can then approach
photographing the Northern Lights with much more ease and relaxation.
(back to the beginning)
written: March 2014, (author: Olaf Juergens)
updated: March 2018
 print version


